10 Jun 2019

Gear: Two Wheel Gear Mini Messenger Handlebar Bag

For the last couple of months, I've been testing out the new Two Wheel Gear Mini Messenger Handlebar Bag.

Now first, I have to start with one of the things I really appreciate about this bag: it's unique. I have never used a handlebar bag before. Further, I didn't really view this as commuting gear; to me, this was more beach or day out gear. But for me, it works great for both.

The more I used it, the more I appreciated having this space up front. Small things like wallet, keys, sun glasses, or phone were much nicer to have right up front, rather than tucked in a bag behind me. If I'm stopped at a red light or need to pull over, I don't even have to get off my seat to access them. I could stop, put a foot down, grab my phone, fire off a quick text to my wife, and be back pedalling within a few seconds.

So while I initially thought I'd use this bag mostly on weekends and stick to my The Classic 2.0 Garment Pannier for commuting, I found I ended up using both on my commutes.

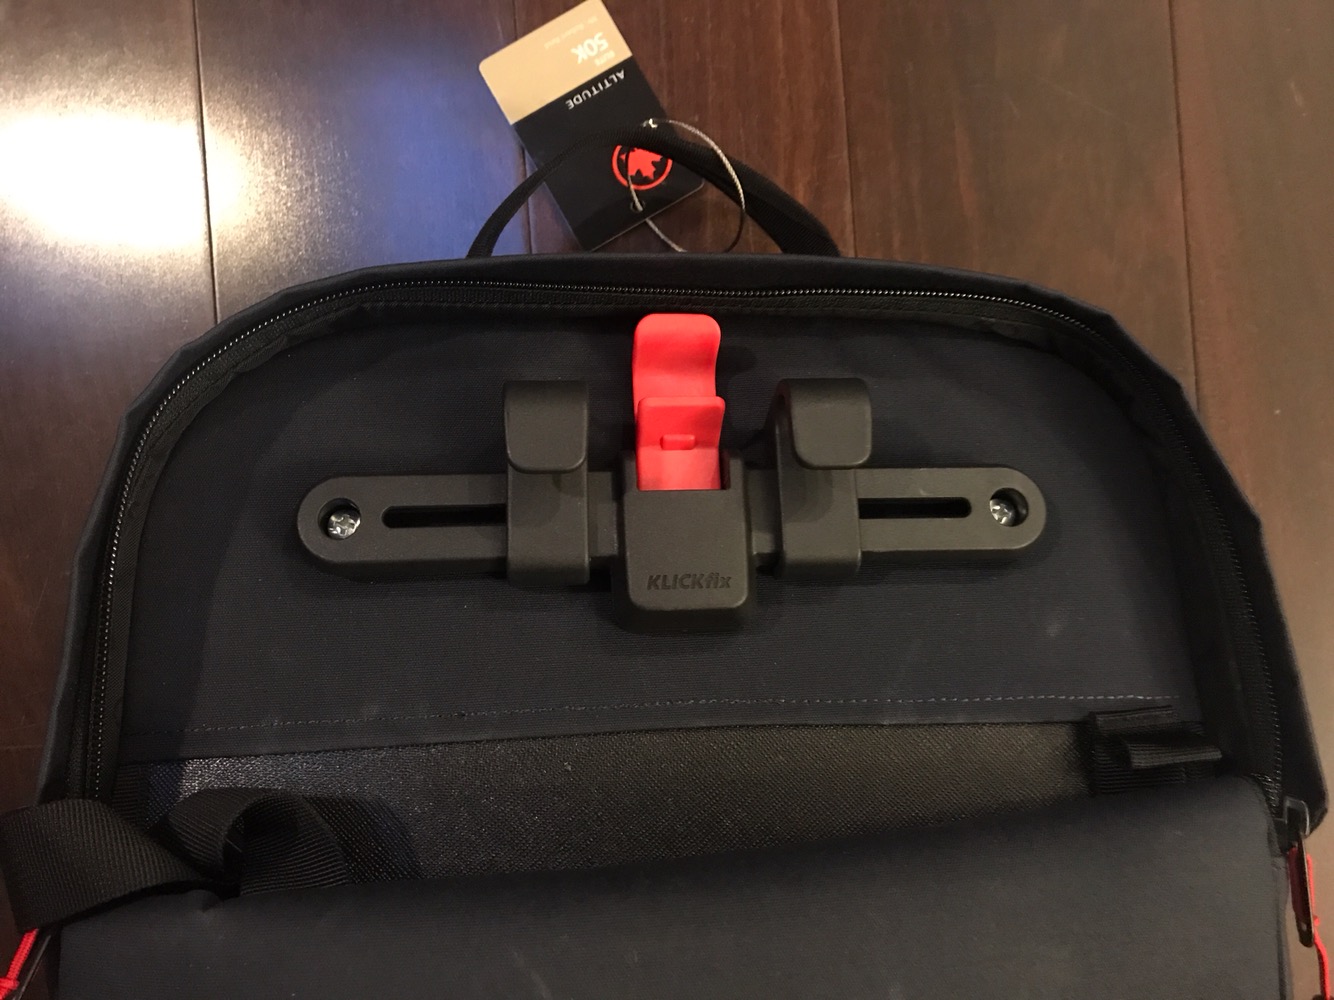
But let's start with the setup - first the mounting hardware. I love that this bag came with all the equipment required to attached this to my bike. I assume front brackets/mounts aren't as common as rear racks, and I have no idea how standardized these brackets are either. Therefore, I imagine it is necessary to provide these with the bag. And Two Wheel Gear does, so you do not have to buy anything extra. The kit comes with two sizing rings for different diameter handlebars. The larger set worked perfectly for me.

It took me about 15-20 minutes to get the bracket set up. It is not difficult by any means, but I took time to make sure I had it adjusted right. There is a wire that goes into the bracket and wraps around the stem to give it extra holding capacity (so the bracket doesn't slide down under weight). It is simple enough to do, but I took a couple tries to get it just right. So I would suggest taking some time with this step.

After that, the bag very easily snaps into the bracket. And press that red button on top, and it pops right off.

As for the bag itself, I really like it. It is the perfect size for small accessories during my commutes, as mentioned above. And for shorter outings, I can go with just this bag. It has enough space for sunscreen and small things I'll need for a casual outing. I can also fit my windbreaker or light jacket rolled up inside. I love Two Wheel Gear's marketing that it is the perfect size for a six-pack (holds up to 10 cans to head to the beach). And it definitely is. With room to spare.

It comes with a shoulder strap to carry it off the bike, although I am not a huge fan of this. I would rather just carry with the hand-strap. The bag is weighted more to the front too, so I found it didn't sit right on my hip when I used the shoulder strap.

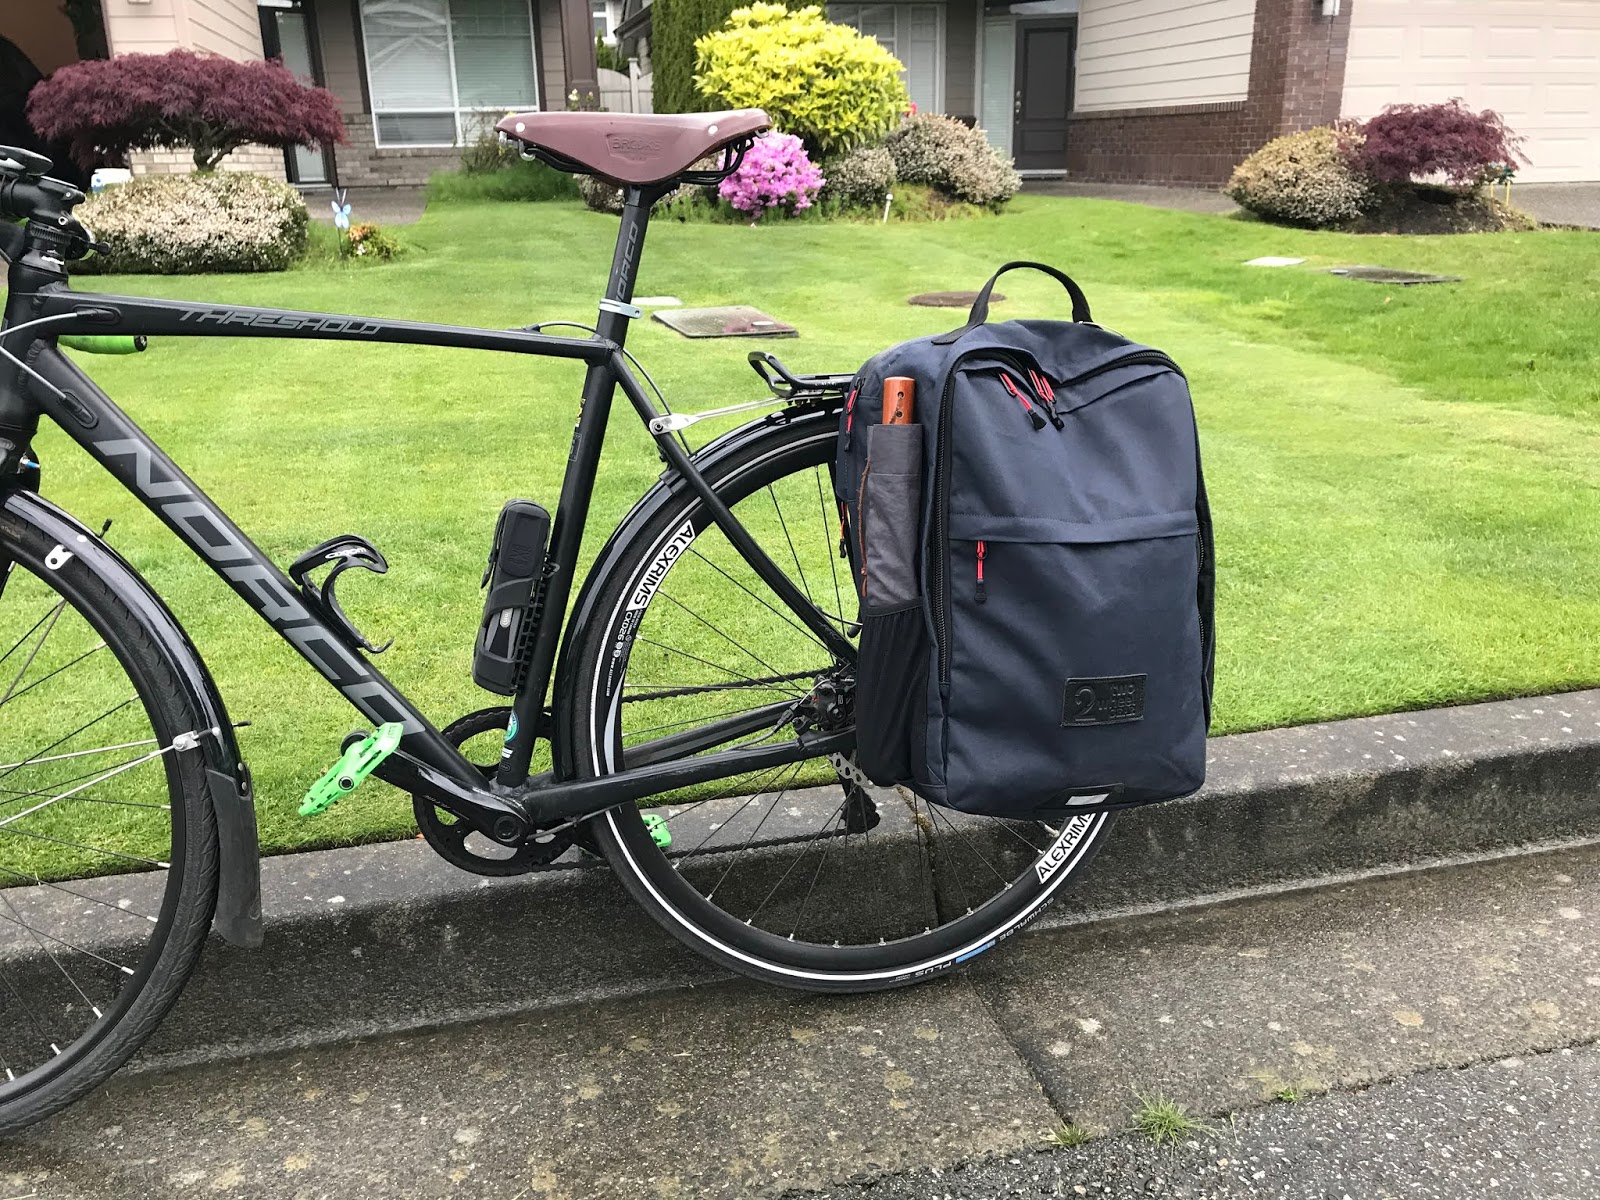
As with all Two Wheel Gear products, it is very well made, with reflective bands on the front. I am a huge fan of the charcoal grey as well, as I've mentioned before.

I have two challenges with this bag though and it's to do with positioning (on my bike with drop bars). The first is the brake/gear cables. Because the cables cross between the drops, where the bag sits, I always have to push the cables out of the way to attach the bag. Obviously, this is just the way bikes with drop bars function, and it is minor, because the bag fits fine once it's in there. But it means it takes two hands to clip the bag in instead of just one.

The other one is my front light. With the bag attached, I had no where to put it. I've always mounted my front light to my handlebars. But the bag blocks where my light would go. Even with the bracket there and no bag, it would block the light entirely on one side. So I had to rethink where to mount my light.

I ended up using this: Origin8 Frame/Fork Eyelet Stub. This stub screws right into one of the cable  mounts along the left side of my front fork. From there, I just attach my light to this stub instead of the handlebars. It looks fine, works. But optically, it takes some time to get comfortable with the light being mounted lower. But I'm getting there. And a very workable solution, but still and extra cost.

Overall, this bag is a fantastic addition to the Two Wheel Gear lineup! It's stylish, functional, convenient, and built to last. It will definitely be a regular part of my bike setup for the foreseeable future.

Here are links to my reviews of other Two Wheel Gear products:
The Classic 2.0 Garment Pannier
Pannier Backpack Convertible (original)
Convertible Bike Briefcase
Pannier Backpack Convertible PLUS+

Full disclaimer: I am a Two Wheel Gear Brand Ambassador. I was provided with this bag by Two Wheel Gear for the purposes of this review.

14 May 2019

Gear: Two Wheel Gear Pannier Backpack Convertible PLUS+


For the past month and a bit, I have been using the new Two Wheel Gear Pannier Backpack Convertible PLUS+ as my daily bag going to and from work. In a nutshell, this bag is a larger version of the original Pannier Backpack Convertible, with a couple additional features that I'll go over here in a bit. Click HERE to read my review of the original Pannier Backpack Convertible.

This bag is designed to be both a backpack and a pannier (i.e. it attaches to a bike rack). And it is great at both! It is comfortable to carry as a backpack and attaches to a bicycle rack quickly and securely as a pannier. Converting from one to the other takes a few seconds. More on that in my review of the original Pannier Backpack Convertible.

I loved the original Pannier Backpack Convertible. It was a well made, beautifully designed bag, that I described as looking stylish enough to carry into the office and rugged enough to handle being attached to a bicycle. But it was small. I couldn't fit everything I needed inside (lunch, laptop, and a change of clothes). This new version fixes that and a few other criticisms I had with the original.

So let's great straight to the things I like. First, capacity. The greatly improved capacity on this bag is awesome - it has a 30L capacity. And when comparing it to the original (which has a 24L capacity), it is easy to see the difference.

I can easily fit a change of clothes, my lunch, my laptop, and still have room for a few other things. In fact, I can even take this bag on short overnight work trips, without needing to take another bag. Even better, the bag doesn't feel bigger on my back. However, I do feel it when it's on my bike. The extra size and weight are apparent. But that, of course, is the trade-off for more capacity.

Second, rather than having the laptop tucked against the back of the main compartment, there is now a dedicated laptop compartment. With the original, it was difficult to pull a laptop in and out, especially if the bag was full. But not anymore. Getting to the office, I don't have to open my dirty clothes compartment to pull out my laptop. Going through airport security, I have easy access to my laptop without unpacking the main compartment. Overall, this is a fantastic upgrade to the design here.

Third, I love the new KLICKfix Kompakt Rail Mounting System. Attaching the bag to my bike is faster and feels more secure than the original system. Plain and simple, it is easier to use and works better. The only possible criticism is that it is slightly thicker; therefore, I can feel it, albeit very slightly, when carrying it on my back (i.e. in backpack mode). It's definitely not uncomfortable - just enough to remind me that there is a latching system there.

And as with all Two Wheel Gear products, the bag is incredibly well constructed. The stitching is precise and well done. The zippers have a sturdy, high-quality feel. Just by using this bag over the past month, I feel like it will last a long time.

My one gripe is that the bottom of the laptop compartment is not padded. So if you put the bag down heavily, or drop your laptop into the compartment, you do risk clunking the corner of your laptop on the ground. To remediate, I throw my laptop in a sleeve before dropping it in the bag.

One of the things I consistently appreciate about Two Wheel Gear products is that they have enough professional polish to carry into the office, and enough ruggedness to handle the bike ride in. They really do nail the perfect balance between polished and rugged.

As for the colour, I got this bag in the waxed canvas, as opposed to the charcoal grey that I usually get (that all my other Two Wheel Gear bags are in). I know other folks that have other bags in waxed canvas and absolutely love it. While I do love the look and feel of it, I feel like it shows scuffs and dirt really easily. One of the benefits of the charcoal grey is that the bag never looks dirty. So while it is definitely a preference, and the bag is available in either colour, I would suggest the charcoal grey to hide the dirt at bit. Again, that is purely preference.

Overall, this bag is a great improvement to what was already a great bag. It now has the extra space, capacity, and organization that I needed. Definitely a recommended buy from me.

Here are links to my reviews of other Two Wheel Gear products:
- The Classic 2.0 Garment Pannier
- Pannier Backpack Convertible (original)
- Convertible Bike Briefcase

Coming soon: Mini Messenger Handlebar Bag

Full disclaimer: I am a Two Wheel Gear Brand Ambassador. I was provided with this bag by Two Wheel Gear for the purposes of this review.

25 Mar 2019

Gear: New Balance 880 v8

Over the past year or so, I had made a few assumptions when picking out new pairs of runners. When the Running Room store in Richmond closed (which is where I live), where I had relied on advice for choosing new shoes, I ended up doing my own research. I loved the Running Room's approach to fitting shoes and their educated staff. Without them to rely on, I was stuck going to Sport Chek (which I will refrain from criticizing here). More recently, a New Balance store opened in Richmond, which had staff trained to properly fit runners. I have now bought a couple of pairs there as well, but I was somewhat concerned going all in with a single brand without being able to compare other brands.

So in November, I found myself in East Vancouver at Forerunners Main Street store. So I took the opportunity to have someone experienced in a variety of brands properly assess and fit me with the right pair of runners for the amount of distance I am currently running.

The result was the New Balance 880 v8. I was glad that it validated the New Balance brand for me so I can continue to go through the Richmond New Balance store, which is definitely the most convenient for me. 

I have just gone over 400 km on these runners, and they are still in great shape. In fact, one of the things I appreciate most about all of the New Balance runners I have had is their longevity. Even after 600 km or even 700 km, the runners are mostly in fantastic shape. Obviously there is some sole wear and degradation, but the shoes still look and feel great. Even a quick run through the wash at this point and they look as good as new. Comparatively, even single pair of Saucony's I have owned would start deteriorating around 400-500 km, either holes in the mesh or parts of the sole peeling off.

I also acknowledge that the 880 v9 were just released. My assumption is that those will be very similar with modest improvements. In fact, I plan to pick up a pair in the next month anyway and will include an assessment of them here when I do.

First off, I have really enjoyed running in the 880 v8s. They are incredibly comfortable and have a really solid fit to hold my foot in place. Further, the amount of cushioning is perfect for the amount of distance I am currently logging on a weekly basis (30-40 km per week on average).

Another thing that I really appreciate about all of the New Balance shoes I have had recently (880 v8, Zante v3, Vazee Pace v2) is how quiet they are on pavement. Similar to the Zante v3, these make almost no noise at all, even with a moderate amount of foot slap.

The lacing system on the 880 v8s is also solid. It provides a nice, consistent tightness that holds consistently throughout a long run. In fact, these are probably the best of any shoe I have ever run in.

My one criticism of these shoes is the tread pattern is atrocious for picking up small rocks. Compared to the Zante v3s (see my review on them HERE), which have a narrow and shallow treat pattern, these have deeper and wider grooves. When I switch from a gravel trail onto pavement, the clacking of the rocks wedged into the treads hitting the ground drives me crazy. The trade-off is probably traction. But alas...

Overall, these have been a great set of runners for me. I will definitely be trying out the 880 v9 and would recommend the v8s to anyone logging similar kilometres training for anything between a 10K to a half or full marathon.

Related
Gear: New Balance Zante v3
Gear: New Balance Vazee Pace v2

20 Mar 2019

Gear: Trekz Air by AfterShokz

About six months ago, in the fall of 2018, I was browsing online and came across an ad for AfterShokz headphones. And after I saw (or noticed) that first ad, I started seeing them all over the place - both online and in stores. So I started to read into them a little bit.

One of the challenges I have had is that I like to listen to podcasts on my long runs, and I sweat a lot, which was causing my regular earbuds to short out. So, I had been looking for a better set for running. So AfterShokz bone conduction thing really caught my attention. For obvious reasons, when I'm out running, I like to hear what's going on around me. That's one of the (only) reasons I liked the Apple EarPods. So AfterShokz looked really appealing.

So, I put the Trekz Air by AfterShokz on my Christmas wish list. And lucky enough, my wife got them for me.

Now, for those that are unfamiliar with them, according to AfterShokz website, the Trekz Air "bone conduction technology delivers music through your cheekbones, ensuring ears remain completely open to hear ambient sounds." The science behind these headphones is even exciting! For more information on the technology, click HERE - fascinating stuff.

From a physical/aesthetic standpoint, these are very sleek looking. The have a softer, almost velvety feeling plastic on them, making them very comfortable against the skin. They look very sleek.The ear pieces sit slightly in front of your ears. They fit extremely comfortably - very light and no pressure points. So they immediately feel quite natural.

The only criticism I have in this regard is the piece that goes around the back of your head/neck sticks out a bit (or maybe I have a small head) and, if I am wearing a toque or something with a collar, it interferes a bit when I turn my head. Minor issue, and generally only a factor during the coldest winter months.

The sound quality on these is very crisp. I had initially thought it would come through muffled, given that they aren't even in my ears and use bone conduction, but the sound is very clear and crisp. However, these do not product much bass. So if you're looking for bass, these are not for you. The Trekz Air, for me, are exclusively my running/cycling/active headphones. So I can deal with the lack of bass given all the other advantages. When I am not running, I have full over-ear headphones for that, which provide all the bass I need.

The Trekz Air are also water resistant. The AfterShokz website says they are "IPS5 certified to repel sweat, dust and moisture, from workouts to wicked weather." I have used them in rain, sweat in them profusely, and even run them under the tap to clean them off at the end of a long run. And they have definitely not had any issues. For me, this has given me a huge piece of mind to not worry about them.

And one of the most important factors, they do not block out any ambient sound. So if I am running in the city, I can hear what's going on around me. I have even used them on a group run and was able to hear my music and the conversation going on around me. Noise cancelling headphones definitely have their place, but when running, cycling, or exploring busy city streets, I feel it is important to hear what's going on around you. And these accomplish that perfectly.

As for battery life, I have had pretty consistent results with what AfterShokz claims on their website: 20 hours standby, 6 hours play time, charge in 1-2 hours. My one rule of them with them is that I need at least 40% battery for my long runs, which are usually 1.5 - 2 hours.

Overall, I have been incredibly impressed with my Trekz Air. I highly recommend them.

19 Feb 2019

Race Report: Vancouver First Half 2019

Last Sunday, February 10th, 2019, which happened to be one of Vancouver's coldest days of the year so far, we ran the Vancouver First Half half marathon. And it was fantastic!

But before I get to race day, I am going to back up a little bit. I had a couple issues in my training build-up for this race. Firstly, the Achilles problems I had from September and October, while drastically improving, are still causing some minor discomfort. The pain is gone, but there is still some tightness. I am careful to stretch and ice as much as possible, and it is improving overall - probably 75% recovered - but it is still there. Secondly, and possibly as a result of my Achilles, I strained my right calf about two weeks before race day.

In general, I was far more consistent with my training for this race than I have ever been before. I stayed with my training plan, almost never missed an activity in the past 12 weeks building up and I stuck to my long run plan.

When I strained my right calf, it was right after the Steveston Icebreaker (my review HERE). As a result, I had to take a solid seven days off running. To substitute without losing any fitness, I road my bicycle instead. To keep the same level of intensity, I added around 25-50% more time to my workouts (so what would have been a 40 minute run was a 60 minute bike ride). My peak long run as well had to be on the bike. But I had a full 7 days before the race to get back to running.

Further, because of my disappointment with my performance at the Fall Classic (my review HERE), I was determined to break 1 hour and 45 minutes at the First Half.

Now to race day. The First Half route is one of my absolute favourites. It's flat. It's fast. And it's beautiful. Starting in front of Yaletown Roundhouse Community Centre, the race starts heading east for a quick lap around BC Place. Back across the start line, the race then moves under the Burrard Bridge and down onto the seawall. From there, following the seawall into Stanley Park, the route crosses south of Lost Lagoon and does a counter-clockwise loop around Stanley Park, on the seawall the whole time. Before the Second Beach Swimming Pool, the route leaves the seawall briefly for a clockwise lap of Lost Lagoon. Then, rejoining the seawall, the route follows the same path along the water, a quick hill climb under the Burrard Bridge, and back along Pacific Blvd towards the Yaletown Roundhouse and the finish line.

I did my usual pre-race routine, breakfast at home (cereal, banana, milk, and lots of water), and headed downtown Vancouver on the Canada Line. To avoid any gastro problems, I've been making sure that I eat at least 90 minutes ahead of my run.

When I got to the Yaletown Roundhouse, it was a cool -5C. And, given the seawall's exposure to the elements, it was forecast to hit wind chills of -10C on parts of the route. So, at the last minute, I added a full base layer under my running pants and shirt to ensure warmth.

As we lined up in the starting corral, it seems almost everyone was solely focused on staying warm. As such, most were swinging their arms, moving their legs, jumping in the spot, etc. And I think this created a lot more space - i.e. folks were far less bunched up compared to past races I have done. This meant that once the race started, it was easier to spread out and find my own pace. Almost immediately, I settled into my target pace for the race - 5:00 / km.

For some reason, this race just felt right for me. Everything clicked. The first 5 km went very smooth, and I managed an average 4:56 / km. Heading out onto the seawall for the next 5 km, I felt even better. I was completely comfortable with my pace, but I was hesitant to push any harder because I wanted to have enough left to maintain that for the full distance. However, I did improve to a 4:45 / km from 5 through 10 km.

Coming around the north and west of Stanley Park is where the cold hit. Now up until this point, I was completely comfortable but was almost concerned that my extra base layer would cause me to overheat. But holy moly, was I glad to have it through this stretch. During this stretch from 11 through 15 km, I dropped to an average 4:52 / km - still strong and within my target range.

During the loop of Lost Lagoon, I was starting to fatigue slightly. But I still felt strong. I was tempted to slow down and rest, but forced myself to maintain pace, stay with the pack I was running with, and push hard through the finish. From 16 through 20 km, I did drop slightly again to an average 4:55 / km - again, still within my goal. But at this point, I started to realize that I was trending well ahead of my 1 hour and 45 minute goal time. Those extra 5-10 seconds shaved off of my 5:00 / km target pace each kilometre were adding up. I tried to run the calculations in my head and figured I could get close to 1 hour and 43 minutes.

For the final few kilometres, my sole focus was to maintain my pace. I was getting tired, but even more so, I was determined. As I came around the final turn, I put it all out. I crossed the finish line, glancing at the clock I saw I was just under 1 hour and 43 minutes. My final gun time was 1:42:59. Even better, my chip time was 1:42:35 - a large new PB for me! I shaved nearly 3.5 minutes off my previous PB!!
Overall, I am absolutely elated! I felt strong throughout and I am incredibly happy with my result. I exceeded my own expectations. Proving to myself that as long as I keep running and executing on my training plan, I will keep improving.

My wife and two kids met me at the finish line. Which is always a big motivator for me in the latter part of a long race like this one - to have them cheer me on near the finish.

After I finished, and consumed a few cups of Nuun (which tastes so darn good after a long run like this), we did a lap through the community centre to shake hands with friends and other runners that we knew. As always, the post-run food selection at the First Half is one of my favourites of all the Vancouver-area races. So we spent about 45 minutes chatting, checking the results, and consuming some much needed calories. Then we headed off home.

Now two things I haven't mentioned yet are the swag - the medal and the shirt. The medal was a large improvement from last year's - very RunVan-esque - similar style to the BMO Vancouver and Fall Classic. The shirt I really like as well, while I haven't had a chance to wear it yet. But I do wish that they would give a long-sleeve shirt, similar to the Victoria half marathon, given the time of year it is. As such, I will have to wait to wear a short-sleeve T until it warms up a bit more.

Overall, this has to be my favourite race. I love the smaller crowd, the dedicated runner atmosphere, the pre and post-race festivities, and the route. I will be back again next year.


12 Feb 2019

Race Report: Steveston Icebreaker 8k

A couple of weeks ago, on Sunday, January 20th, Kajaks hosted their annual Steveston Icebreaker 8k. While the event has run for several years now, this was my first time participating. Further, this year the organizers added the New Balance Kids Run 1k - a very welcome addition in my small family. So I signed up for the 8k and both of my kids for the 1k.

Before I start, this event is put on by Kajak's, Richmond's local track & field club. All proceeds, therefore, go to Kajak's. So, rather than a for-profit event like many major running events, this one is a fundraiser. As such, there are no shirts, no medals, no swag. But that's what makes it so pure. Not only is it a fundraiser, it's a fundraiser for an organization that teaches running. 

And because this is in Steveston, the southwest corner of Richmond, it is very close to my home. The route follows along a part of the Richmond dyke system that I run often, especially on my long runs. So, really, it's a wonder that I haven't run the Icebreaker before. I was really pumped to get out there and run it this year.

Further, I had heard that many local elite runners show up for this one. Probably similar to the Eastside 10K, it is likely easier to throw a fun 8k or 10k into one's regular training routine than a longer run.

So let's get down to race day.

We (my wife, our two kids aged 8 and 4, and myself) showed up relatively early, around 7:45am, to make sure we got parking and had time to organize ourselves. We were a bit earlier than necessary, so walked over to Starbucks for a little pre-race R&R.

The Kids Run started at 8:30 and the Icebreaker 8k at 9:00. So, while I was initially a little bit nervous that these were too close together, the timing was actually perfect. Both events used the same Start/Finish, which made the transition from one event to the next extremely easy.

The Kids Run started along the Imperial Landing (the Richmond dyke that runs along the south arm of the Fraser River, starting just east of No 1 Road). It was a 1.15 km loop out around the lagoon and back.

The distance was perfect. Both of my two kids have run similar distances before, so they were eager to participate. My eight-year-old son, really starting to enjoy running and finding his legs, ran alone. We had been training semi-regularly in the weeks leading up, doing 500-1000 m runs around our block, so he was well prepared. He immediately pushed to the front, ending up passing the pacer on a bicycle (who wanted to remain leading the majority of the kids), and ending up winning with about a 100 m lead over second place. The Kids Run wasn't timed, unfortunately, but my son kept his time and is quite happy with it. 

I ran the Kids Run with my four-year-old daughter. Despite a minor tangle and crash at the beginning, she got up and ran the entire race without stopping. She, too, had been doing some training runs and was very excited to enter a race, have a race bib with a number on it, and earn her finisher's ribbon.

After a few minutes of family celebration and congratulations to the kids, I had to lineup for the Icebreaker 8k. Conveniently, I was already at the corral as both events used the same Start/Finish line. I know this sounds minor, but I've been to a few other events where that wasn't the case. This setup made the transition extremely simple.

My wife took the two kids over to the Community Centre, which was hosting the post-event festivities, to do some activities while I ran, and came back to watch me finish.

The 8k started promptly at 9:00. The route started out the same as the Kids Run, but continued much farther along the south dyke. Essentially, it follows the trail along the river all the way to No 3 Road, and then back. A very straight-forward out-and-back route. This year, they also had partially closed Dyke Road to vehicle traffic, so the race course had the gravel trail going out, and the eastbound vehicle lane coming back. I had heard that this was not always the case in past years. So that definitely allowed a safer running environment and more space for the runners.

Also, similar to my comments on the Eastside 10K, because this was an out-and-back route, it was a lot of fun to pass and cheer on other runners I knew. I enjoy seeing the top runners pass by, seeing how they are positioned near the middle of the race compared to how they finish at the end. And I enjoy watching, waving, and cheering for other runners I know. 

This year did not draw the elite crowd that I had heard would show up though. Despite a strong showing from the Mile 2 Marathon (M2M) crew, the usual elites were running elsewhere. While slightly disappointed, I hope to see more of them return next year.

As for actual race performance, I was aiming to break my previous 8 km PB of 00:35:37, which I set in Victoria back in October (click HERE for my recap on that event). I knew that to run under that time, I would need to average under 4:30 per km. After about 2 km, I knew that I wasn't going to be able to achieve that. I am not sure why, my legs just did not have it on race day. I ended up finishing in 00:36:35. I am still happy with that time and won't dwell on it, but it is my first race event where I did not improve on my PB.

Now, I admit that I missed out on one of the key aspects of this race: the post-race festivities. My son had a soccer tournament shortly afterwards so we had to head home and get ready for that. So I missed out on, what I have heard, is one of the best calorie replenishing displays at a Vancouver-area race. While I would have loved to stuff my face with a couple donuts and bananas, I'll have to save that experience for next year.

Overall, we all had a blast. I loved watching my son embrace his 1k event and love every second of it. I loved running the 1k event with my daughter and watching her enjoy the experience of running. I loved running my own 8k event, despite being a bit slower than I had hoped. I loved the route of both of these events and the smaller "community" feeling of this event. And I also loved to support our local Kajak's Track & Field Club. I will be back next year.


5 Feb 2019

Gear: New Balance Fresh Foam Zante v3

A few months ago, I purchased a pair of New Balance Zante v3's.

Wait... let me back up.

For the past few years, I have purchased all of my running gear at the Running Room. However, the store in Richmond (where I live) closed. So earlier in 2018, I bought a pair of shoes from Sport Chek. Now, the biggest difference between Running Room and Sport Chek is the service that you get. I find that at the Running Room, they look at your feet, how you plant your foot, inquire about the type of running and distance. Then, they recommend a shoe based on your responses. At Sport Chek, you're basically on your own. They will help you fit into a running shoe, but whether they know what neutral and stability means is really up to the individual.

Well, recently a New Balance store opened in Richmond, so I thought I would try it out. And I was pleasantly surprised. The staff was knowledgeable and very helpful. Much more like the Running Room experience I was used to.

However, since I was last properly fitted for running shoes, I have dramatically increased my mileage as well. So I was looking for a different type of shoe than I had been buying in the past. And that is perhaps where I went wrong.


After trying a few different shoes, I settled on a pair of Zante v3's. I was aware that the v4's were already out but the v3's fit, were very comfortable, reasonably priced, and my son liked the all black colour. I had read several reviews on Zantes and so had a good impression of them before I even tried them on.

At the insistence from my son, I got the all-black (with some white) version. I knew the v4's came in much brighter colours, so I was a bit disappointed with the black - for me, it felt a bit bland for my liking. But my last pair was far too flashy so I was due for a relapse of some sort.

My review of the shoes themselves is great. I was initially very impressed with how smooth and quiet the shoes felt. Evening when tired, there was almost no sound foot slapping on the pavement. With the smooth, less-groovy-style sole pattern, it gave a really smooth, interesting feeling. I loved running in this.

The Zante v3's are very comfortable. Perhaps slightly narrower in the toe area than I normally like and the toe drop feels a bit more dramatic than I am used to, but otherwise very comfortable.

In six months with them, I have logged almost 300 km (note they are not my principal running shoe). I use them mostly for travel (i.e. pack in my suitcase for runs when I'm out of town), treadmills, and shorter runs on dry days. And when I am travelling (for work), I often wear these to and from the airport and as my after-work shoes when I'm out of town - saves me having to bring a pair of shoes for in the office, one for after work, and yet another for running. So I wear these for more than just running. And after all this time, they are still in flawless condition with barely a scuff on them. The knitting is holding up really well and they are as comfortable today as the day I bought them.

My only issue is that with the longer runs and increased mileage I was logging, these shoes just weren't enough cushion for my ankles (mainly my Achilles) and calves. Now I definitely appreciate that this is my own short-coming and nothing to do with the shoes themselves. But this is part of the reason I shifted away from these as my principal running shoe. I have since bought a pair of New Balance 880 v.8's - review on those coming soon - that I use as my main runner, simply for the extra cushioning.

So would I recommend the Zante's - either the v3's or a new version? Absolutely. But if you're logging longer distances (i.e. regularly over 12 km, building to half marathons or more), you may want to consider something with a bit more cushioning.